Excel Tips & Tricks: How to Use the "IFERROR" Formula

Excel is a powerful tool for organizing, analyzing and presenting data. However, even the most experienced users can make mistakes. One of the most common problems in Excel is the appearance of error messages, such as #N/A, #VALUE, #REF, and others. Fortunately, the "if error" formula in Excel can help you avoid these errors and ensure your data is accurate.

In this blog, we’ll explore what the "if error" formula is, how to use it.

What is the "if error" formula in Excel?

The "if error" formula in Excel is a conditional formula that returns a specific value if a formula generates an error. It allows you to control the error messages that appear in your data and replaces them with a value or text of your choice. The formula is written as follows:


=IFERROR(value, [value_if_error])


The "value" argument is the formula or expression you want to evaluate. The "[value_if_error]" argument is the value or text you want to appear if an error occurs.


How to Use the "if error" Formula in Excel?


Using the "if error" formula in Excel is easy. Simply follow these steps:


1.Enter the formula or expression you want to evaluate in a cell.

2.Select the cell where you want to apply the "if error" formula.

3.Enter the formula =IFERROR(value, [value_if_error]) in the formula bar.

4.Replace "value" with the cell reference containing the formula or expression you want to evaluate.

5.Replace "[value_if_error]" with the value or text you want to appear if an error occurs.

Press the Enter key to apply the formula.

Do watch a video to understand this IF ERROR formula ЁЯСЗ


The "IFERROR" formula in Excel can be used with many other functions such as:


1.VLOOKUP

2.INDEX/MATCH

3.SUMIF/SUMIFS

4.AVERAGEIF/AVERAGEIFS

5.COUNTIF/COUNTIFS

6.DIVIDE (to avoid "#DIV/0!" errors)

7.Nested IF statements

It can also be used with text and date functions like LEFT, RIGHT, CONCATENATE, and DATE.

Excel Mastery: Mastering the IF-OR Function for Player Selection in Sports Data Analysis

Excel is a powerful tool that allows you to organize, analyze, and visualize data in various ways. One of the most fundamental functions in Excel is the IF-OR function, which is used to test multiple conditions and return a specific result based on those conditions. In this blog post, we will explore how to use the IF-OR function in Excel using a tabular data set of player scores to determine player selection.

The IF-OR function in Excel is written as "=IF(OR(condition1, condition2, ...), value_if_true, value_if_false)". The function will test the conditions specified in the parentheses and return the value specified in "value_if_true" if any of the conditions are true, or the value specified in "value_if_false" if all of the conditions are false.

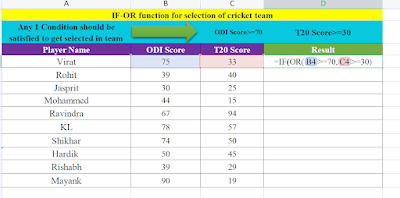
For our example, we will use the tabular data of player names, ODI scores, and T20 scores, and we want to add a column that will show whether the player is "Selected" or "Not Selected" based on their scores. The criteria for selection is that a player's ODI score must be at least 70, or their T20 score must be at least 30.

Step1. Write a data in tabular form as shown in below picture


Step2. With respect to predefined conditions start typing formula as shown in below picture


Step3.Type the values as per selection criteria


Step4.Press enter key and drag it up to last cell


As we can see, the IF-OR function has allowed us to quickly and easily test multiple conditions and return a specific result based on those conditions. This is just one of the many ways that the IF-OR function can be used in Excel, and understanding how to use it can be a valuable tool in organizing and analyzing data.

It's important to note that in this case we used OR function instead of AND to check both the conditions, as we want player to be selected if either of the score meet the criteria.

Click here to learn more about if formula

Click here to learn how to calculate incentive using IF formula


Mastering the IF AND Formula in Excel: A Beginner's Guide to Data Analysis

Welcome to our latest blog post on the power of the IF AND formula in Excel. Whether you're a student, a business professional, or just someone who wants to organize and analyze data, Excel is an incredibly useful tool to have in your arsenal. One of the most powerful features in Excel is the ability to use logical formulas, such as IF and AND, to make sense of your data and make informed decisions. In this blog post, we will be diving deep into the IF AND formula, explaining what it is, how it works, and providing examples of how you can use it in your own data analysis. 

We will also be providing examples of how the IF AND formula can be used in real-world scenarios, such as determining the passing or failing of students based on attendance and marks. So, whether you're a beginner or an advanced Excel user, keep reading to learn more about the IF AND formula and how it can help you make sense of your data.

Let's learn the IF AND function to decide the result of students as Pass or Fail.

Criteria to pass the exam- Attendance>=75% and Marks>=50

To determine whether each student has passed or failed based on attendance and marks using the IF and AND formula, you can use the following formula in Excel:

=IF(AND(B4>75,C4>50),"Pass","Fail")

(Click here to watch video tutorial)

In this formula, B4 and C4 represent the Attendance(%) and Marks respectively for the first student (ohn Smith). You can then drag the formula down to the rest of the cells in the "Pass/Fail" column to apply it to the rest of the students.

Step 1: Create a new column in your Excel sheet called "Result" where you want to show the results.

Step 2: Select the first cell in the "Result"  column. In this example, it will be D4.

Step 3: Type the following formula in the selected cell: =IF(AND(B4>75,C4>50),"Pass","Fail")


Step 4: Press Enter to apply the formula to the selected cell.

Step 5: Drag the fill handle (the small square located in the bottom-right corner of the selected cell) down to the rest of the cells in the "Result"  column to apply the formula to the rest of the students.


Step 6: Observe the results in the "Result"  column. If the student has attendance more than 75% and marks more than 50, the cell will show "Pass" otherwise "Fail".

In conclusion, the IF and AND formula in Excel is a powerful tool for data analysis that allows you to make decisions based on multiple conditions. By using this formula, you can quickly and easily determine whether students have passed or failed based on attendance and marks. This guide provides a step-by-step tutorial on how to use the IF and AND formula in Excel and this formula can be used in many other scenarios where multiple conditions are to be evaluated.

By mastering the IF and AND formula, you can improve your data analysis skills and make better decisions with your data.

Mastering the IF AND Formula in Excel: A Beginner's Guide to Data Analysis- Video Tutorial

 Welcome to our video tutorial on how to use the IF and AND formula in Excel to determine whether students have passed or failed based on attendance and marks. In this tutorial, we will be walking you through each step of the process, from creating a new column in your Excel sheet to applying the formula to the rest of the students. We will also be discussing the importance of data analysis and decision making in today's world, and how mastering the IF and AND formula can help you make better decisions with your data. So, whether you're a student, a teacher, or a professional, this tutorial will provide you with the knowledge and skills you need to analyze your data and make data-driven decisions. So, grab your computer, and let's get started!


Mastering the IF Formula: A Guide to Calculating Incentives in Excel

 In the world of sales, incentives can be a powerful motivator for employees to reach their targets and exceed them. One way to calculate these incentives is by using the IF formula in Excel.

The IF formula is a logical function in Excel that allows you to test a condition and then return a value based on the outcome of that test. In the context of incentive calculation, this can be used to determine the amount of incentive an employee should receive based on their sales performance.

To use the IF formula for incentive calculation, you'll first need to set up a spreadsheet with the following columns: employee name, sales and incentive. Next, you'll need to determine the criteria for calculating the incentive. This could be based on a percentage of sales or a fixed amount for reaching or exceeding the sales target.

Once you have the criteria in place, you can use the IF formula to test whether an employee's actual sales meet or exceed the target and calculate the incentive accordingly. For example, if the sales target is Rs.50000 and the incentive is 5% of sales for reaching or exceeding the target, the formula would be:

=IF(B2>=A2,B2*5%, "")

We can see step by step procedure with images

1.Organize the data in tabular form with columns as Employee name, Sales and Incentive


2.Start typing if formula with logical test as shown in image.


3.If logical test is true then 5% of incentive to be calculated. Hence type as per below image.

4.If logical test is false, then 1% incentive to be calculated as shown below.

5.Now press enter key and drag down the formula up to last cell.

6.You can see the incentive calculated for all employees. For better visualization we will format the numbers into currency.

In this way if formula is used for incentive calculation.

The IF Formula for Incentive Calculations: A Step-by-Step video Tutorial


Video tutorial- Pass or Fail: Using the IF Formula to Calculate Student Results in Excel

Please watch a video to learn if formula
 

Pass or Fail: Using the IF Formula to Calculate Student Results in Excel

In Excel, you can use the IF formula to calculate whether a student has passed or failed based on their marks. The basic syntax for the formula is:

=IF(condition, value if true, value if false)

To check if a student's marks are greater than or equal to 40, the condition would be:

A1 >= 40 (A1 is the cell where student's marks are stored)

If the condition is true (i.e. the student's marks are greater than or equal to 40), the formula would return "Pass". If the condition is false (i.e. the student's marks are less than 40), the formula would return "Fail". So the formula would be:

=IF(A1 >= 40, "Pass", "Fail")

You can also use this formula in other cells to check for other students.
Below is the step wise procedure shown with images for better understanding.
To watch a video tutorial you can visit the linkЁЯСЙVideo Tutorial
 Otherwise you can learn through stepwise procedure written below

1. Write all the data in organized way as shown in below picture


2. We have decided the criteria of marks. So we will enter a formula accordingly. Type a criteria as logical test.


3. Now type a result to be printed if criteria is met. i.e. if marks are >=40, then Pass should be printed.


4.Now type a result to be printed if marks are less than 40 i.e. Fail


5. Now press Enter key and drag the formula up to last cell.

6.In this way result of all student is calculated in few seconds using if formula. In below image failed students are highlighted with Red color


How to calculate grades of students using Excel | рдПрдХ्рд╕ेрд▓ рд╡ाрдкрд░ूрди рд╡िрдж्рдпाрд░्рде्рдпांрдЪ्рдпा рдЧ्рд░ेрдбрдЪी рдЧрдгрдиा рдХрд╢ी рдХрд░ाрдпрдЪी

 We can calculate grades by using If formula.

What is if formula?

"If" рд╕ूрдд्рд░ рдо्рд╣рдгрдЬे рдХाрдп?

The IF function in Excel is used to perform a logical test and return one value if the test is true and another value if the test is false. The basic syntax of the IF function is as follows:

=IF(logical_test, value_if_true, value_if_false)

The "logical_test" is a comparison or logical statement that returns either TRUE or FALSE. The "value_if_true" is the value that is returned if the logical test is true. The "value_if_false" is the value that is returned if the logical test is false.

For example, if you wanted to test if a cell in a spreadsheet contains a value greater than 100 and return "Greater than 100" if true and "Less than or equal to 100" if false, you would use the following formula:

=IF(A1>100, "Greater than 100", "Less than or equal to 100")

where A1 is the cell containing the value to be tested.

Excel рдордзीрд▓ IF рдлंрдХ्рд╢рди рддाрд░्рдХिрдХ рдЪाрдЪрдгी рдХрд░рдг्рдпाрд╕ाрдаी рдЖрдгि рдЪाрдЪрдгी рд╕рдд्рдп рдЕрд╕рд▓्рдпाрд╕ рдПрдХ рдоूрд▓्рдп рдЖрдгि рдЪाрдЪрдгी рдЦोрдЯी рдЕрд╕рд▓्рдпाрд╕ рджुрд╕рд░े рдоूрд▓्рдп рдкрд░рдд рдХрд░рдг्рдпाрд╕ाрдаी рд╡ाрдкрд░рд▓ी рдЬाрддे. IF рдлंрдХ्рд╢рдирдЪी рдоूрд▓рднूрдд рд╡ाрдХ्рдпрд░рдЪрдиा рдЦाрд▓ीрд▓рдк्рд░рдоाрдгे рдЖрд╣े:

=IF(рд▓ॉрдЬिрдХрд▓_рдЯेрд╕्рдЯ, value_if_true, value_if_false)

"рд▓ॉрдЬिрдХрд▓_рдЯेрд╕्рдЯ" рд╣े рдПрдХ рддुрд▓рдиा рдХिंрд╡ा рддाрд░्рдХिрдХ рд╡िрдзाрди рдЖрд╣े рдЬे рд╕рдд्рдп рдХिंрд╡ा рдЕрд╕рдд्рдп рдоिрд│рд╡рддे. "value_if_true" рд╣े рдоूрд▓्рдп рдЖрд╣े рдЬे рддाрд░्рдХिрдХ рдЪाрдЪрдгी рд╕рдд्рдп рдЕрд╕рд▓्рдпाрд╕ рдкрд░рдд рдХेрд▓े рдЬाрддे. "value_if_false" рд╣े рдоूрд▓्рдп рдЖрд╣े рдЬे рддाрд░्рдХिрдХ рдЪाрдЪрдгी рдЪुрдХीрдЪे рдЕрд╕рд▓्рдпाрд╕ рдкрд░рдд рдХेрд▓े рдЬाрддे.

рдЙрджाрд╣рд░рдгाрд░्рде, рдЬрд░ рддुрдо्рд╣ाрд▓ा рд╕्рдк्рд░ेрдбрд╢ीрдЯрдордзीрд▓ рд╕ेрд▓рдордз्рдпे резрежреж рдкेрдХ्рд╖ा рдЬाрд╕्рдд рдоूрд▓्рдп рдЖрд╣े рдХी рдиाрд╣ी рд╣े рддрдкाрд╕ाрдпрдЪे рдЕрд╕ेрд▓ рдЖрдгि рдЦрд░े рдЕрд╕рд▓्рдпाрд╕ "100 рдкेрдХ्рд╖ा рдоोрдаे" рдЖрдгि рдЕрд╕рдд्рдп рдЕрд╕рд▓्рдпाрд╕ "100 рдкेрдХ्рд╖ा рдХрдоी рдХिंрд╡ा рдмрд░ोрдмрд░ीрдЪे" рдкрд░рдд рдХрд░ा, рддрд░ рддुрдо्рд╣ी рдЦाрд▓ीрд▓ рд╕ूрдд्рд░ рд╡ाрдкрд░ाрд▓:

=IF(A1>100, "100 рдкेрдХ्рд╖ा рдЬाрд╕्рдд", "100 рдкेрдХ्рд╖ा рдХрдоी рдХिंрд╡ा рд╕рдоाрди")

рдЬेрдеे A1 рд╣ा рд╕ेрд▓ рдЖрд╣े рдЬ्рдпाрдордз्рдпे рдЪाрдЪрдгी рдХрд░ाрдпрдЪी рдЖрд╣े.

Today let us see how ifs formula works.

(Click here to learn If formula with example)

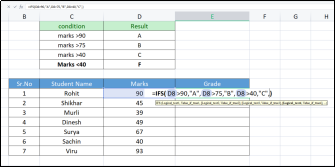
Today we will learn how to use ifs formula to analyze the result of students. We have marks of seven students and we want to show the result of students in Grade column by using multiple conditions.

 рдЖрдЬ рдЖрдкрдг рд╡िрдж्рдпाрд░्рде्рдпांрдЪ्рдпा рдиिрдХाрд▓ाрдЪे рд╡िрд╢्рд▓ेрд╖рдг рдХрд░рдг्рдпाрд╕ाрдаी ifs рдлॉрд░्рдо्рдпुрд▓ा рдХрд╕ा рд╡ाрдкрд░ाрдпрдЪा рддे рд╢िрдХू. рдЖрдордЪ्рдпाрдХрдбे рд╕ाрдд рд╡िрдж्рдпाрд░्рде्рдпांрдЪे рдЧुрдг рдЖрд╣ेрдд рдЖрдгि рдЖрдо्рд╣ाрд▓ा рдЦाрд▓ीрд▓ рдЕрдЯी рд╡ाрдкрд░ूрди рдЧ्рд░ेрдб рдХॉрд▓рдордордз्рдпे рд╡िрдж्рдпाрд░्рде्рдпांрдЪा рдиिрдХाрд▓ рджाрдЦрд╡ाрдпрдЪा рдЖрд╣े.


Please follow below steps to analyze results using if formula

рдЗрдл рдлॉрд░्рдо्рдпुрд▓ा рд╡ाрдкрд░ूрди рдиिрдХाрд▓ांрдЪे рд╡िрд╢्рд▓ेрд╖рдг рдХрд░рдг्рдпाрд╕ाрдаी рдХृрдкрдпा рдЦाрд▓ीрд▓ рдЪрд░рдгांрдЪे рдЕрдиुрд╕рд░рдг рдХрд░ा

Step 1. Start typing ifs formula in 1st cell of Grade column as =ifs and type 1st condition as shown in below table and press comma(,). Once you press comma you can start writing second condition.

рдЧ्рд░ेрдб рдХॉрд▓рдордЪ्рдпा 1рд▓्рдпा рд╕ेрд▓рдордз्рдпे ifs рдлॉрд░्рдо्рдпुрд▓ा =ifs рдо्рд╣рдгूрди рдЯाрдЗрдк рдХрд░рдгे рд╕ुрд░ू рдХрд░ा рдЖрдгि рдЦाрд▓ीрд▓ рдЯेрдмрд▓рдордз्рдпे рджाрдЦрд╡рд▓्рдпाрдк्рд░рдоाрдгे 1рд▓ी рдХंрдбिрд╢рди рдЯाрдЗрдк рдХрд░ा рдЖрдгि рд╕्рд╡рд▓्рдкрд╡िрд░ाрдо(,) рджाрдмा. рдПрдХрджा рддुрдо्рд╣ी рд╕्рд╡рд▓्рдкрд╡िрд░ाрдо рджाрдмрд▓्рдпाрдиंрддрд░ рддुрдо्рд╣ी рджुрд╕рд░ी рдЕрдЯ рд▓िрд╣ाрдпрд▓ा рд╕ुрд░ुрд╡ाрдд рдХрд░ू рд╢рдХрддा.


Step 2.Type second condition in a formula as shown in below table. After completion of 2nd condition press comma(,).

рдЦाрд▓ीрд▓ рд╕ाрд░рдгीрдордз्рдпे рджрд░्рд╢рд╡िрд▓्рдпाрдк्рд░рдоाрдгे рд╕ूрдд्рд░ाрдордз्рдпे рджुрд╕рд░ी рд╕्рдеिрддी рдЯाрдЗрдк рдХрд░ा. рджुрд╕рд░ी рдЕрдЯ рдкूрд░्рдг рдЭाрд▓्рдпाрдиंрддрд░ рд╕्рд╡рд▓्рдкрд╡िрд░ाрдо(,) рджाрдмा.

Step 3. Once you enter comma(,), you can start writing 3rd condition. So start writing condition as shown in below table

рдПрдХрджा рддुрдо्рд╣ी рд╕्рд╡рд▓्рдкрд╡िрд░ाрдо(,) рдПंрдЯрд░ рдХेрд▓्рдпाрд╡рд░ рддुрдо्рд╣ी 3рд░ी рдЕрдЯ рд▓िрд╣ाрдпрд▓ा рд╕ुрд░ुрд╡ाрдд рдХрд░ू рд╢рдХрддा. рддрд░ рдЦाрд▓ीрд▓ рддрдХ्рдд्рдпाрдордз्рдпे рджрд░्рд╢рд╡िрд▓्рдпाрдк्рд░рдоाрдгे рдЕрдЯी рд▓िрд╣िрдг्рдпाрд╕ рд╕ुрд░ुрд╡ाрдд рдХрд░ा

Step 4. This step is crucial step in this formula. We know that Below 40, grade should be F. So to mention that this is the last  condition, type ‘True’ as shown in below table.

рд╣ी рдкाрдпрд░ी рдпा рд╕ूрдд्рд░ाрддीрд▓ рдорд╣рдд्рдд्рд╡ाрдЪी рдкाрдпрд░ी рдЖрд╣े. рддुрдо्рд╣ाрд▓ा рдоाрд╣ीрдд рдЖрд╣े рдХी 40 рдЪ्рдпा рдЦाрд▓ी, рдЧ्рд░ेрдб F рдЕрд╕ाрд╡ा. рдд्рдпाрдоुрд│े рд╣ी рд╢ेрд╡рдЯрдЪी рдЕрдЯ рдЖрд╣े рд╣े рдирдоूрдж рдХрд░рдг्рдпाрд╕ाрдаी, рдЦाрд▓ीрд▓ рддрдХ्рдд्рдпाрдордз्рдпे рджाрдЦрд╡рд▓्рдпाрдк्рд░рдоाрдгे 'True' рдЯाрдЗрдк рдХрд░ा.


Step 5. Once you type ‘True’, you will write a final condition. This condition will mean that if all 1st three conditions are not true then “F” will be printed. Type the condition and press Enter. Please refer below table.

рдПрдХрджा рддुрдо्рд╣ी 'True' рдЯाрдЗрдк рдХेрд▓्рдпाрд╡рд░ рддुрдо्рд╣ी рдЕंрддिрдо рдЕрдЯ рд▓िрд╣ाрд▓. рдпा рд╕्рдеिрддीрдЪा рдЕрд░्рде рдЕрд╕ा рд╣ोрдИрд▓ рдХी рдЬрд░ рд╕рд░्рд╡ 1рд▓्рдпा рддीрди рдЕрдЯी рд╕рдд्рдп рдирд╕рддीрд▓ рддрд░ "F" рдЫाрдкрд▓े рдЬाрдИрд▓. рдХंрдбिрд╢рди рдЯाрдЗрдк рдХрд░ा рдЖрдгि рдПंрдЯрд░ рджाрдмा. рдХृрдкрдпा рдЦाрд▓ीрд▓ рд╕ाрд░рдгी рдкрд╣ा.


Step 6. Do the selection from 1st cell in Grade column to last cell in Grade column and press Ctrl+D. We will get the result of each student.

рдЧ्рд░ेрдб рдХॉрд▓рдордордзीрд▓ рдкрд╣िрд▓्рдпा рд╕ेрд▓рдкाрд╕ूрди рдЧ्рд░ेрдб рдХॉрд▓рдордордзीрд▓ рд╢ेрд╡рдЯрдЪ्рдпा рд╕ेрд▓рдкрд░्рдпंрдд рдиिрд╡рдб рдХрд░ा рдЖрдгि Ctrl+D рджाрдмा. рдк्рд░рдд्рдпेрдХ рд╡िрдж्рдпाрд░्рде्рдпाрдЪा рдиिрдХाрд▓ рдоिрд│ेрд▓.


In this way even if you have 100 or more than 100 students data, you can calculate their grades in few minutes.

рдЕрд╢ा рдк्рд░рдХाрд░े рддुрдордЪ्рдпाрдХрдбे 100 рдХिंрд╡ा 100 рдкेрдХ्рд╖ा рдЬाрд╕्рдд рд╡िрдж्рдпाрд░्рде्рдпांрдЪा рдбेрдЯा рдЕрд╕рд▓ा рддрд░ीрд╣ी, рддुрдо्рд╣ी рдХाрд╣ी рдоिрдиिрдЯांрдд рдд्рдпांрдЪ्рдпा рдЧ्рд░ेрдбрдЪी рдЧрдгрдиा рдХрд░ू рд╢рдХрддा.

We can use the same if formula for deciding the result as Pass or Fail.


Top 30 Most Useful Excel Shortcut keys


Excel shortcut keys are important because they can save a significant amount of time and effort when working with large or complex spreadsheets. With shortcut keys, you can perform common tasks, such as copying and pasting, with just a few keystrokes, rather than having to navigate through menus and ribbons to find the appropriate command. Additionally, shortcut keys can help you work more efficiently by allowing you to quickly access frequently used commands and tools.

Shortcut keys can also help reduce the risk of errors, as they allow you to perform tasks quickly and accurately, without having to take your hands off the keyboard. This can be particularly useful when working with large amounts of data, as it allows you to quickly navigate through your spreadsheet and make changes without having to constantly move your cursor around the screen.

Here are some important shortcut keys you should know:ЁЯСЗ


1

Ctrl + C

Copy

2

Ctrl + V

Paste

3

Ctrl + X

Cut

4

Ctrl + Z

Undo

5

Ctrl + Y

Redo

6

Ctrl + A

Select all

7

Ctrl + F

Find and Replace

8

Ctrl + P

Print

9

Ctrl + S

Save

10

Ctrl + N

New workbook

11

Ctrl + O

Open workbook

12

Ctrl + W

Close workbook

13

Ctrl + Tab

Switch between open workbooks

14

Ctrl + Shift + Tab

Switch to previous workbook

15

Ctrl + Page Up

Switch to previous worksheet

16

Ctrl + Page Down

Switch to next worksheet

17

Ctrl + Home

Go to the beginning of a worksheet

18

Ctrl + End

Go to the end of a worksheet

19

Ctrl + Arrow keys

Move to the edge of a data range

20

Shift + Arrow keys

Select a range of cells

21

Ctrl + Shift + Arrow keys

Select a range of cells and all cells in between

22

F2

Edit cell

23

F5

Go to a specific cell or range

24

F7

Spell check

25

F11

Create a chart

26

Alt + =

Auto-sum

27

Ctrl + Shift + &

Apply border to selected cells

28

Ctrl + Shift + _

Remove cell borders

29

Ctrl + Shift + +

Insert a new row or column

30

Ctrl + -

Delete selected row or column


In this way, using shortcut keys can help to improve your productivity as you don't have to spend time looking for the command you need, this can add up over time, especially when working on large projects or with large amounts of data. So, mastering Excel shortcut keys can make you a more efficient and effective user of the software.


Best hospitals in chandwad

If you are a student living in a hostel or if you are new in chandwad , here is the list of best hospitals in Chandwad,Tal.Chandwad Dis.Nash...